The Screws You Meet Before a Laptop Can Be Repaired
Similar-looking screws can hold different parts or reach different depths. A clear repair guide and a small piece of paper can prevent a frustrating mistake.
In this story 6 sections
A laptop cover can have a dozen dark screws that look identical while they are in place. Once arranged side by side, only some of them may match. A longer screw can reach farther than its shallow opening is meant to allow. A shorter one can run out of useful thread before it clamps anything. The distinction is easier to preserve while taking a cover off than to rediscover while trying to put it back on.
Count locations before counting pieces
Find the repair documentation for the exact model. Photographs of a close relative may show fasteners in the same general region without telling you whether they are the same size. Look for separate instructions for battery isolation, hidden fasteners and captive screws. A captive fastener is meant to stay with a part even when it is loosened. An unexpected gap or point of resistance can be a clue that a screw was missed or that a latch still has work to do. Resist the urge to solve an unknown attachment by prying hard.
Draw an outline of the device from the angle you will actually be looking at it. Mark a recognizable edge such as the hinge or an opening where a cable enters. Use the outline as a map for putting loose pieces in assigned spots. A shallow parts tray or taped pieces of paper can keep them steady. If someone moves a row, a record of the lengths in the manual is useful; if you can keep positions intact, you rarely need to compare two tiny screws under a light while the computer is open.
The fastener is part of the repair experience
Fasteners join parts. They also determine how much time and uncertainty it takes to reach something behind them. Standard heads make a difference if you have a limited set of tools. Different lengths make sense where a thin area cannot accept the same screw as a thicker assembly. A few reused sizes and clear documentation can reconcile those demands. That is more informative than saying a device is repairable because it contains screws, or impossible to repair because it contains several different kinds.
The assembly beyond the cover influences the decision too. Access to a replaceable part might depend on clips, adhesives, a delicate connector or a battery procedure. If the manufacturer’s documentation treats a job as suitable only for trained service or you are unsure how to make it safe, stop there. Damaged or swollen batteries call for specialist handling. A reassuring photograph of a neat group of screws does not make a battery or connector safe to pull.
The head only tells you which tool to reach for
Two screws with the same recess can differ in length, thread, shoulder or the surface under the head. The recess is a fact about how the driver engages. It does not tell you how deeply the screw should go or how it seats in a particular hole. A fastener intended to sit flush in a shaped recess will look different from one meant to hold down a flat bracket. A wider head may spread pressure over the material underneath. When two fasteners can each be turned with the same driver, keep the choice of driver separate from the choice of location.
It helps to imagine a screw in section. The part below the cover may have only a small amount of room for threads. A short fastener can feel as if it catches while providing little useful engagement. In a thin area an excessively long fastener can contact something that should be well clear of it. There may be a circuit board, a delicate cable or another part of a case underneath. A screw that finishes with its head standing proud is useful evidence that something deserves checking. Adding force can obscure the evidence and create a new defect.
Choose a tool that fits the job specified in the service guide. A worn bit or one that looks approximately right can slip out and deform the recess. That is particularly costly when the rest of the assembly is in good condition and one small fastener prevents access. When the bit does not sit firmly or the part seems unusually difficult to turn, stop for a better identification. Support the surrounding part according to the guide. A flat work surface, good light and time to examine the recess can make more difference than choosing a longer handle.
Keep the screws with the stage of the repair
The short record at the start should include a way to tell the top of the device from the bottom even after the cover has been moved. Use one container or outline for the exterior and a different one for each interior bracket or subassembly. A screw can look like an obvious match while you are working on one stage and become ambiguous when three groups of pieces are lying together. When the guide shows lengths, write them beside the locations you sketched rather than relying on the order of a photograph. Make a note when a fastener stays with its cover so that the number of loose parts does not appear to be short by one later.
A picture before removing a part can include its label or orientation along with the screws. A picture with the part already detached has a different use: it lets you count and compare the pieces that were removed. Both can be valuable if you know which stage each picture describes. If the repair is interrupted, put the pictures in order before taking the next thing apart. You can also place a short note directly in the parts tray. Write where you stopped, which section belongs next and whether the machine is still awaiting a model-specific safety step.
If you already received a device with a missing screw, the empty hole does not establish an appropriate replacement. Check the model documentation, part list or the service provider’s recommendation. An apparently identical piece from another machine can have a different thread or seat. Sometimes a replacement cover or spare comes with its own set of fasteners; confirm which instructions apply to that part. The aim of using a repair manual is to restore the intended attachment, including where the original condition is uncertain.
A repair includes checking the fit on the way back
Before installing a cover, compare its position with the last picture or service illustration and check the documentation for any clips or alignment points involved. A cover sitting unevenly can mean that a part has moved or an edge has not seated. Screws should not be the means of hauling an unknown obstruction into place. Pay attention to any specified order and tightening guidance in the model instructions. If it was necessary to deal with the battery or another major component, follow the complete instructions for those stages. No universal screw sequence can replace the guide for that equipment.
The work is easier to evaluate if you can compare it with a short description of the machine before opening. Did an edge already sit high? Was a hinge making a sound? Knowing the previous state keeps you from attributing an old fault to the last turn of a screw. On reassembly, a new gap or a newly stiff part is a reason to pause and check the placement and assembly. Do not keep applying force to make the two states appear alike. Resolving a poor fit while the cause is still fresh can avoid another long disassembly.
These decisions are useful even to somebody who never opens a device. Compare two service guides for the part you are likely to replace. Look for clearly identified fasteners, accessible spares, identifiable tools, and a sensible way to reach the target. A single familiar screw head is good news, but the complete account of a repair includes the preparation, the intervening parts and a way to recognize a successful fit. A good guide helps a reader assess all of that before placing a tool on the first screw.
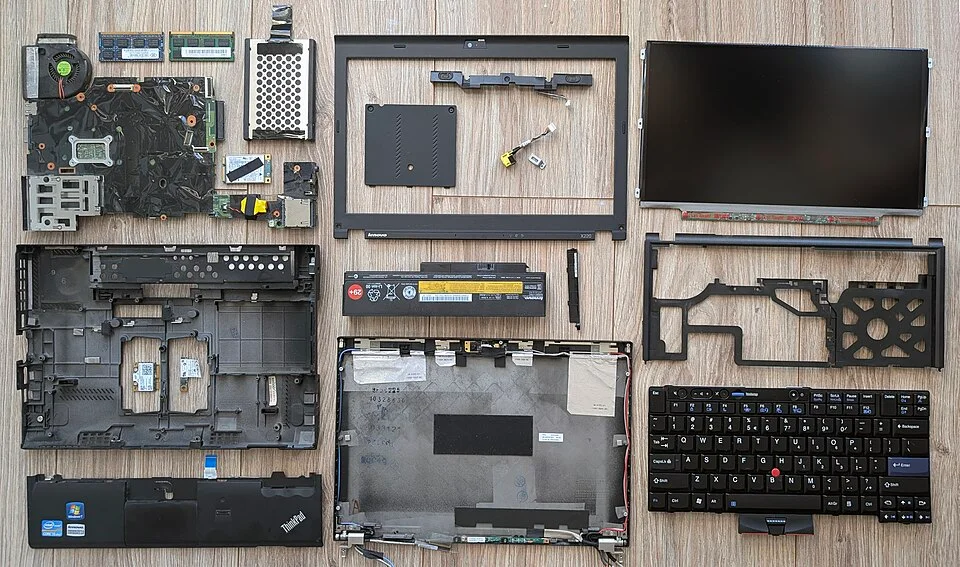
Device photographs can support this comparison if you check what they show. The photograph for this article records the separate parts of a ThinkPad. The linked step-by-step guide covers a different model and illustrates how an actual repair is documented. The two views answer separate questions. One shows how much room the pieces can occupy once removed. The other shows which stage makes a particular fastener relevant. Use the labels and the service documentation for your exact device before applying anything from a photo. During a repair, being able to name the stage is often more valuable than recognizing a familiar-looking part in a collection of images.
Record what the next opening would require
Before you close the repair guide, save its version or exact address and a note about the model you checked. If you were choosing between a repair and handing the equipment on, write down which parts are available and which job would still require specialist help. The most useful comparison between two devices may be the time and certainty it takes to reach a part that is likely to wear. A good map of the screws is one observable part of that larger question. It shows which decisions the designer leaves to a reader and which have already been made clear.